Does the thought of soldering bring you out in a cold sweat? Understanding the principles could hold the key to success. In this article we get to grips with the basics to turn your sweaty soldering sweet!
Soldering is without doubt the most common jewellery technique that students stress over, and it’s the single most important indication of the quality of a piece of jewellery. It’s how we identify the amateur from the professional, or the cheap mass-produced fashion jewellery from the high end, well crafted hand made jewellery we aspire to make.
Most of us have in our memories a soldering disaster that we are too shamed to share. So what went wrong?
Soldering skills will of course improve after long hot hours at the bench, but to really demystify the process you need to understand the science behind it so you can create a true recipe for success. Till you understand your result you’ve got to keep asking ‘Why does this happen?’
In class this term we have been talking about the unique atomic structure of metals, how heating affects the structure of metal and why noble metals are different from base metals. All strangely useful stuff, and you can join us on Tuesdays to find out the full details – but here’s a quick summary of the basic principles of soldering:
Metal Properties
All metals have their individual properties. We have noble metals (palladium, rhodium, gold, silver) and base metals (tin, aluminium, copper, iron); we have pure metals (all of the above) and alloys (brass, bronze, sterling silver, carat golds).
Some metals are hard, others soft. We like to make use of these individual properties. All metals have differing melting points from very very low (like mercury for example) to very high (Palladium).
Noble metals tend not to oxidise, even when heated.
Base metals (and alloys containing base metals, eg sterling silver, various carat golds) will naturally oxidise in the air, and we refer to this commonly as tarnish. When heated this speeds up the oxidation process considerably, and can be seen as a brown or black surface on your metal during and after it has been subject to heat of any kind.
Oxidation is a problem in 2 ways – firstly it causes discolouration of your metal which can be hard to shift – and secondly it prevents solder from being able to join to it. Back to this point in a minute…..
Basic Soldering Principles:
Silver soldering is in fact a brazing technique; it requires a fairly high temperature, and provides a permanent join that will stretch, bend and otherwise behave (almost) integrally to the metal you have joined together.
Silver soldering (brazing) should not be confused with welding (the strongest type of metal bond you can create) where like metal is fused to itself to create a structurally complete, pure metal join. Nor should it be mistaken for the type of soldering used in electronics which is a very low-heat operation using a filler metal and a soldering iron to stick elements together (not much better than glueing).
Silver solder – the actual substance – is an alloy of silver with some other lower melting metals and this gives the solder a lower melting point than silver or the other metals you are likely to join with it. ((600 – 800˚ melting temps depending on the type)
When metal heats, it expands and it is this principle that we take advantage of in silver soldering to create such a powerful bond; as the metal is heated to 630 – 770˚ C (depending on the solder type) our solder melts on to the surface and fills the ‘space’ that is created in the expanded metal. As the metal cools it contracts, thus binding in the solder that flowed into the open structure. (I liken it to the pores of your skin, how they open when hot). This is what makes the bond such a strong one.
Requirements for Soldering Success:
1. Solder flows like water when molten. It will suck by capillary action between close fitting surfaces, in the way a drip of water spreads between a glass and the table. It will not fill gaps, silver solder is not a filler!!!
2. For solder to flow, the solder and the metal parts to be joined must be clean and oxide free throughout the process.
3. Heat control is key. Solder once molten will flow towards heat. Gravity is less influencing than the effect of capillary action and heat control in causing the solder to flow where you’d like it.
So, for a join to work the pieces of metal to be joined must be super-close fitting. When preparing your metal, cut accurately, file well, check the fit from all angles regularly.
Base metals (copper, steel) and alloys containing lesser metals that oxidise (eg brass, bronze, sterling silver, carat golds) will require a flux to ensure the metal remains clean and clear of oxides throughout the soldering process.
Setting up in preparation for the soldering process should be carefully done using appropriate heat reflective or heat absorbing materials to assist in controlling the flow of heat when soldering.
The Magical Process: How it should be…
Your joint is a perfect fit. You have set up your pieces to be joined using binding wire / gravity /soldering wig / silicon carbide / honeycomb blocks/ pins/ reverse tweezers/ charcoal – or whatever else your preferred setup. You have applied your flux of choice to the join and you have placed perfectly sized pallions of fluxed solder along the join. You light your torch and with a neutral flame you gently warm the metal to settle the solder before building the heat up to soldering temperature, avoiding the solder itself. Using the reddening colour of the metal as a guide you ensure both parts of the metal to be joined are equally hot. The solder begins to melt and with the tip of the flame you draw the solder with its heat from one end of your seam to the other. Perfect! You allow the metal to cool slightly before quenching and pickling. Checking your work, you see a perfect flow of solder joining the elements together.
No???? Really?????
- Solder flowed everywhere! – Reduce the quantity of solder. Practice your flame control.
- Solder didn’t melt! – Roll your solder strip thinner and cut your pallions thinner so they are more proportionate to the metal you are joining.
- Solder balled up, didn’t adhere to metal! – Practice your flame control. Check you are not losing heat inadvertently from a heat sink – even tweezers will alter the heating requirement. Avoid heating the solder directly until the last minute to ensure the metal is hot enough to receive it.
- Everything moved out of position just when the solder was ready to flow! – Grrr..annoying! Spend more time setting up.
- Solder didn’t flow, metal oxidised! Sounds like a flux issue! you need to…..tune in for the next instalment of Soldering tips to learn all about fluxes!
Next up: Soldering tips for jewellers – Five Fluxes to remedy your soldering blues.
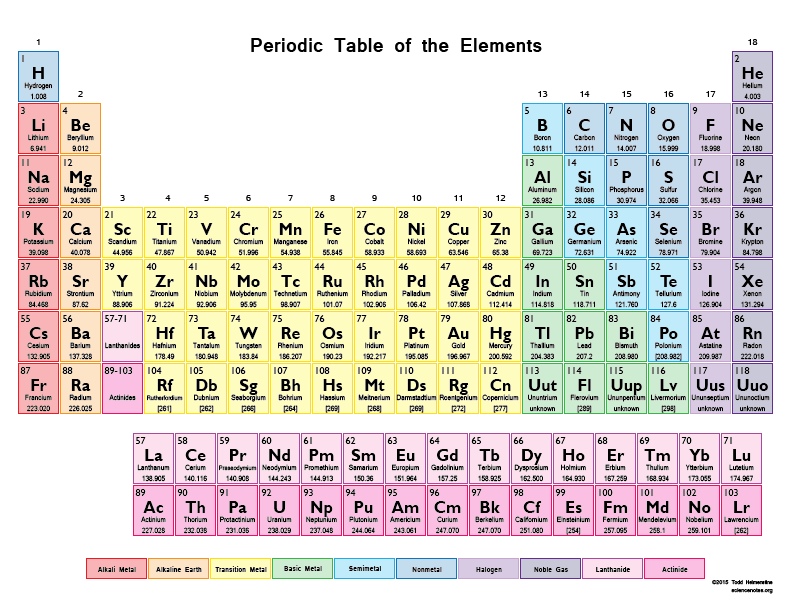
Finally, for all the insatiably curios out there who’d like a reminder about just how many metals there are in our amazing world, check this table out here. (all the yellow, green and light blue ones are metals)